Tuesday, February 24, 2015

Powder Room Reno Under $500

Yes. You read the blog title correctly. I renovated my powder room for under $500. And it looks like it stepped out of Better Homes and Gardens.

So let's start with the before.


It's not that bad right? Well it's not really. But, it's very very pink. And as much as I love my tiny casita, I have never planned on living in it forever. That's right folks, Casita Amanda is slated to become a rent house. The plan has always been to live in my postage stamp sized house for 5 years and then skeedattle on to bigger and better things, while renting out this baby to make a little cha-ching cha-ching. But life, as you may know, does not always go according to plan. This bathroom reno has been 7 years in the making. It may be possible for me to move on to my bigger and better things in a couple of years, making me four years behind schedule. But that's ok. In the meantime, we get to make Casita Amanda clean, neutral, and above all low maintenance. 


See that? See how the counter has been thoughtfully extended to provide extra shelf space? See how it's right over the toilet tank, where you totally can't get to the tank to make repairs? That is our problem my friends. That is not low maintenance. In the past, when I've had to make repairs to the toilets in this house, I've done it by taking a flash photo with my phone of the inside of the tank, and then squeezing my arms between the tank and the countertop and working off the photo. Basically blind. And it sucks. This countertop has got to go. Which means the tile has got to go. So, down to demo.


First, I scored the caulk around all the little porcelain thingamabobs like this soap dish here, with my utility knife. 


Then I took a putty knife, and used a hammer to gently pry it from the wall. One of my well meaning relatives suggested I sell tickets to my demo to help pay for the renovation. Well, no offense to said relative, but that is a horrible, if entertaining idea. For several reasons. 

1. That is a liability nightmare. Morons with sledge hammers wanting to bust stuff up are bound to hurt themselves or someone else.
2. They will likely destroy something I want to keep in my bathroom. Like the vanity. Cheap, boring, ugly vanities at Home Depot cost at minimum $250. That's like, my entire budget. I'm keeping the one I've got thanks, there's nothing wrong with it. 
3. They will destroy something I don't want to keep in my bathroom. The soap dish, toothbrush holder, towel bar, most of the tile, the countertop, and the light fixture are all being donated to Bart's Barn. Just because I think they're hideous and outdated, doesn't mean someone else can't use them. 

Demo is as delicate as surgery. You'll save a lot of hassle, time, and money if you're careful and don't go around hitting things with sledge hammers. Save that for the DIY channel. 

Next. Tile comes out. 


By being careful I managed to only break about half a dozen of the tiles. The rest got carefully removed and packed into boxes for Bart's. If you'll notice there's an extra sheet of plaster board between the actual wall and the tile. Not sure what was up with this, but I've seen it in several bathrooms of this era. Something about giving depth to the wall? The bullnose tiles cover the transition. 
Hulk smash!

Whatever. It's coming out. All it does is take up space in an all-too-tiny powder room. This was actually quite satisfying to rip out with my bare hands. 

At this point, I needed to get the sink out, so I could remove the countertop. Again, there's nothing wrong with the sink, so I kept it. Why should I spring for a new sink when the old one just needs cleaning? The pipes on the other hand...

I guess I just don't know my own strength.
I kind of righty tightied, when I should have lefty loosied. And the P trap cracked. Hey, it's hard to tell which way you're going when you're under the sink like that with everything all backward. Well it was 50 years old, and brittle. So there's a small unexpected expense. A new plastic one was about $2.50.


With the sink out, I ran my utility knife down the sides of the counter top and popped that baby off like a cork from champagne. 

And then we removed the toilet the same way we did Boyfriend's.  I don't want to think about why the tile behind the toilet is oddly discolored. Let's not mention it again. Then I removed the lower tile. Now, word of warning, a putty knife is not the correct tool for this job. What you actually want is a type of chisel, and you can find it in the paint section near the putty knifes. It's blade is much thicker and isn't flexible. If you use a putty knife, you're going to end up ruining it. Like I did. 

That's a tear. In the metal. It actually got much worse. 

The lower tile does not have an extra layer of drywall behind it, so I had to do a lot of chipping away at the mastic and sanding to get it sorta smooth after the tile came down. 


I used joint compound to fix all the damage to the wall from where the tile came down, skim coated the wall behind the toilet and added texture to make it look sorta like the rest of the room. Here's a before of the flooring in here. 
Vinyl is always in style right?

One layer of vinyl is over the whole floor. It looks like they didn't remove the toilet the last time they redid the flooring. So, we ripped that out. 

At this point I painted the walls a nice neutral grey and installed a new light fixture. Of course, I found the light fixture at Bart's Barn. For $15. 
Similar lights cost $27 new. 
Saved $12, and donated to a worthy cause. That's what I call a win.
Installed without electrocution = win. 

Now. The countertop. I saw this neat post on pinterest, and basically just followed her tutorial. Cause I think it's pretty. And cheap. And my vanity was not a standard size anyway. 

source

So, cedar. I used Liquid Nails and clamps and lots of time to attach some beautiful cedar to a chunk of plywood. 
One can never have enough clamps.

Now I had a problem. Since I didn't have a new sink, I didn't have a template. But I did have a countertop with the right sized hole in it. And some cardboard. 


So I traced around the hole and cut out the cardboard.  Voila. Template. 


So. Next I measured the distance from the back of the old counter to the hole, and lined up my template in the same place on the new countertop. 
Measure twice, cut once. 
It's important to get the sink in the right place so the P trap will line up. The water lines in are flexible, but the P trap is rigid, and there isn't a lot of wiggle room. 

Then we drew around the template, drilled a hole, and cut out the middle with a jigsaw. 

Watch your fingers. 

This post is getting kind of long. I'm beginning to think I should have split it into at least two parts, like the Twilight movie. They knew the power of double the revenue. Oh well, we'll power through. Next we dry fit the sink. 

Boyfriend says watch the hoses!

Everything fit, so we were ready to install. Notice the lip on the back of the plywood? That's for my backsplash. 


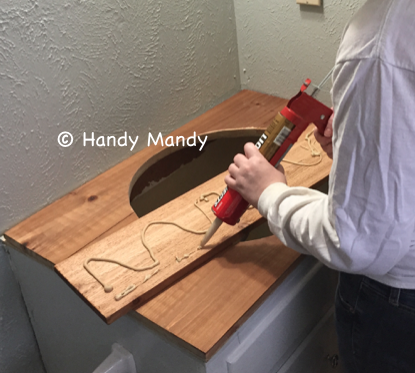
I had a little extra wood, and there was a gap of about 3/4 an inch when I was done with the counter, so, backsplash. It looks kind of sauna like. I just dabbed on some Liquid Nails. 

It's an Amandaclamp.
And smushed it up against the wall. The backsplash actually keeps the countertop in place with the lip on the plywood. All the cedar is stained and treated with Thomson's Water Seal, just like it was on a deck. This is a wet area, and even cedar will rot. 

This is seriously my least favorite part of this job. 
So now we pop the sink in place, and hook up the plumbing. After the plumbing is put back together, I secured the sink to the countertop with these little clippy things. 


Then I nailed the front trim onto the countertop, and this counter and sink are going nowhere. 

You might have noticed the floor tile. I bought this floor tile 7 years ago, when I put it in my front bathroom. I was feeling very Nicole Curtis at the time, and I still love the pattern. Don't worry, I factored the tile into the budget. It's such a small space, that the tile only cost about $100. But I was too cheap to rent a tile saw for three cuts. All the edges but the threshold will be covered by quarter round. So I Jerry-rigged this together and cut the tile with a diamond saw. 

The right tool for the job always makes things easier, but this will work. 

After removing the quarter round, doing a dry fit, and some cuts around cabinets and such, we tile. 

Goop goes on floor. Tile goes on goop.

I used an adhesive and grout in one combo, because with these tiny little mosaic tiles, the adhesive tends to come up in the grout lines. And I didn't feel like scraping grout out from in between a million little hex tiles. 


Grouting is kind of impossible to screw up. Once the tile has set for 24 hours, you spread goop on with a float.


A float is a rubber thingy you spread grout with. 
Push the goop in the crevices. 

Now, it's impossible to grout and not get grout on the tile. Which you don't want, you want shiny clean tile. So, you immediately wipe the grout off the tile before it hardens. Grab a bucket of water and a sponge. With a wet sponge, wipe the floor keeping the sponge flat. Don't scrub, you don't want to take the grout out of the crevices. 

Wax on, wax off. Grout on, grout off.

Keep the sponge flat, and rinse it often. Squeeze it out really good and just keep wiping. 

There's no soap in the bucket, that's grout goo.

Let the grout dry at least 8 hours before you walk on it or anything. Then put the quarter round back up. After spending half an hour, angry at my quarter round, my finish nails, my hammer, myself, I pulled my 8th bent nail out of the trim and went and bought the brad nailer I've been wanting for at least four years. 

Say hi to Brad, my newest toy. 

I'm a miserly penny pincher, but sometimes you just need the right tool for the job. I pulled the old nails out of each piece of trim, and cleaned up the caulk from the edges.


And by the way, all of your trim should be labeled. This was a tiny job, and there was no real way I could get it mixed up, but I labeled it anyway. Because trying to figure out a jigsaw puzzle when you're wanting to put trim up can cost you valuable time. 

This was SO much easier. 
Brad nailers like this have a safety feature. You can't shoot a nail out of this gun unless the tip is depressed against some surface. So, press the tip against the trim, and hold down the trigger until the brad pops out and fastens your trim in place. Each nail takes like 2 seconds, instead of 15 minutes and half a dozen expletives. I love this tool so much. And it's battery powered. No cords, no air compressor. I'm in love. 

So, when you're done, your trim will look pretty crappy. 
I broke this piece getting it out. 

There is a magical substance that will make it look like new again.

Put some joint compound on your finger and run it along all the cracks between the pieces of trim. When it dries, touch up the paint, and it will look like one piece. Just like new. 

When I painted, I took out the blinds in the window. I hate blinds. They're dirty and they discolor and they get stuck if you open them too far. They're just yucky. So I sewed a curtain to go in their place. Curtains are better than blinds. 


I am not a sewer. That's my lovely Aunt and my Mom and my late Grandmother. I missed out on the girly stuff like gardening and sewing, and headed straight for the power tools. But sewing is kinda neat, and I can make curtains all day long. Anyone can learn to sew straight lines. If mom taught me one thing though, it's to press your seams. Otherwise it looks like you did it yourself. Also, trim off all your stray threads. Professionally made curtains don't have stray threads. 

Mine look like they came from HomeGoods. 

Boyfriend helped me find this fabric on the clearance aisle at Joann's, and I used my teacher discount for a sweet deal. What do you think?

Ready for the after pictures?

I didn't hardly mess up the pattern! Just a little in the corner. 


Grand total? $426.42. And that's including $139 for Brad. $100 of that was spent on tile, 7 years ago. $80 was bought with gift cards from my lovely family this Christmas. It looks so clean, so spa like. I can't wait to get my hands on the front bathroom this summer. 

Oh YEAH!


Sunday, December 28, 2014

Eau de Toilette

You remember Boyfriend?

There was a mosquito.

Well, Boyfriend had family come stay from out of town over the Christmas holiday. So we had to get a guest room and a bathroom that were functional and comfortable. The guest room was mostly a decorating issue. The bathroom however, had some issues. See, there was a leak in the wall when Boyfriend bought the house. So he hired a plumber. And while the leak is fixed, and the pluming looks good... Well, take a look.

The plumber told Boyfriend it would look just fine once we painted it. 

It's an "expansion gap"

Ok, so the plumber sucks at drywall. We can fix this right? And the toilet rocks like a hobby horse, and the plumber reused the old wax ring. Ok, gross but fixable. We won't be using that particular plumber again. And perhaps Angie's List has a new review.

Step one, assess the damage. For some reason there was an air vent cover (no air vent here) covering a large hole in the drywall.
Let's just get that out of the way shall we?

This is where it got kind of hard to maneuver. So we pulled the toilet out.

We turned off the water, and flushed the toilet. 


Boyfriend bailed out the bowl and then we used a sponge and some rags to get ALL the water out.


We removed the nuts on these bolt thingies that hold the toilet in place. I'm sure they have a real name. 


And we disconnected the water hose from the tank. An aluminum casserole dish is perfect to catch any drips. Then Boyfriend lifted straight up on the toilet, we scrapped the wax off the bottom, and slid the whole commode into a closet on top of a towel that we fully intended to throw away after we finished this project. 

We were left with a gaping hole in the ground that leads to the sewer. If you're doing this, you want to plug that hole up with a rag to avoid any sewer gas coming up into your home. 
Water go down the hole.  Nothing come up the hole. 

Next I got to work ripping out the "patch" that the plumber put in, and squaring up the preexisting hole in the wall. This took quite a bit of work. Turns out, plumber guy didn't bother getting joint compound to fill in the seams of his patch. Instead he used bathroom caulk, which is stretchy and very difficult to remove from drywall and wood. 

I look like a hunchback because I'm pulling on a bit of caulk with all my might.

Then we clean up, and measure the opening.
Remember to flare out your fingers for dramatic effect. 

We chose to go with mildew resistant dry wall, because we're in a bathroom, and what's more, this is a wet wall. There was very obvious damage to the drywall and the wood inside the wall where water had leaked out. We checked, and the leaks are gone, but you never can be too careful. Mold can make you very miserable.

Measure twice, cut once.

There's a big hole in it for a reason. We decided that in the event that anyone needed to get to the pipes again, an access panel would be more convenient than ripping out the wall. So we did that. Sand your edges smooth when you do this.

After a couple of dry fits, we screwed the drywall into place. Be sure to counter sink all your screws. That means the head of the screw needs to be below the surface of your drywall for you non handy people out there. This is so your wall will be smooth with no screw heads popping up.
Counter sunk screw. Notice the expansion gaps. Of about 1/8 of an inch. 

Now we were ready to mud and tape the joints. You use joint compound for this. Not bathroom caulk. Just saying. 

Spread a generous layer of compound over all the seams.
Action shot!

Then get joint tape, and press it into the wet compound. Use your putty knife to cut the tape to length.


Then carefully spread joint compound over the tape. Try not to move the tape as you do this. I found it best to start in the center and work my way to the edge of the seam before running up or down the seam.

Messy, messy, messy!

Let this dry for 24 hours before you do anything else. When you're done you shouldn't really be able to see the tape.

No tapes!
Now, the rest of the wall was textured so we needed to texture the patch, so it didn't stick out like a sore thumb. We did this by spreading joint compound over the entire area, and then taking a barely moist sponge, the kind you use for grouting, and pressing it into the wet compound. I would squeeze the sponge and roll upward. It's not exactly the same as the rest of the wall, but you can't really tell where the patch is without really looking.


Again, it needs to dry for 24 hours. And then we painted. Because, how often do you get to paint behind your toilet? 
Patch? What patch? I don't see a patch.

Now we removed the rags from the sewer pipe, and scraped off all the old wax, and got it clean as we could. We put in some new bolt thingies to hold the toilet, and made sure they were aligned properly.


Then we tightened the bolts holding the tank to the bowl, because that was rocking precariously, and set the toilet back in place, with a BRAND NEW wax ring. We had to shim it with plastic shims, because when the plumber poured the concrete for the floor, he didn't get it exactly level. Hence the hobby horse. We tightened the bolts by hand and then with a wrench. Make sure when you do this that you go back and forth from the left bolt to the right bolt to make sure you're level. Once the bowl was level and tight to the ground, we cut the shims and caulked around the bottom of the tank. 
Somewhere in there we popped in the access panel. 

Then it was just a matter of connecting the water, turning it on, letting it fill and checking for leaks.

There's nothing like a bathroom reno to make sure your relationship was meant to last. I think he's a keeper.


Monday, August 4, 2014

Antique Sideboard

There are a number of names for it. Sideboard. Credenza. Buffet. Cupboard. Press. Cabinet. Hutch. It's a narrow piece of furniture for holding articles of table service. It's top is convenient for preparing dishes or storing hot dishes you're about to serve. They tend to be found in the dining room. I bought mine in a desperate attempt to extend my counter space before the fabulous kitchen overhaul of 2013. It was on craigslist for $150.


The top is solid marble, and the cabinet is 100% quarter sawn oak. It is put together with mortise and tenon joints, dovetail joints on the drawers, wooden pegs, and very little hardware. No glue, no nails. and the only screws are there to keep the drawer hardware on. This is a true antique. I'm guessing - and I am no expert - due to the way it's made, the hardware (which I think is original) and the art deco designs on the front, that it was built around 1920-1925. If you are an expert, and I'm wrong PLEASE contact me. I'd love to have an accurate date for this beauty. 

And I scooped it up for $150. 

Now. Don't get me wrong, when I bought it only one of the drawers had a drawer. The other drawer face had just been screwed into the frame to keep it from moving. The door moulding on the front was cracked and in danger of falling off. The paint was chipping and awful. There's a couple holes in the top where pegs obviously once fit to hold two long since broken and discarded shoulders in place. The backsplash rocked and wouldn't stay put due to the shoulders being gone. It was in crappy shape.

My dad built me a drawer for the other drawer face and I used wood glue to fix the moulding on the front. But other than that, I pretty much just used it as it was.

Until now.

See that? That's the back of the sideboard coming away from the side. Because of the amazing craftsmanship of this piece, it's survived for almost 100 years. And yet, because it doesn't have any fasteners at a lot of the joints, as the wood ages, dries and shrinks, the joints don't fit together quite as strongly as they once did. And that marble top weighs like 150 pounds. It's not connected, and the rocking back and forth has caused a few of the joints to become loose. I knew if I wanted to keep this piece for another 100 years, it needed some attention.

Some idiot had spray painted the entire cabinet this steel blue - including the hardware. I painstakingly removed the hardware and saved the tiny little slot head screws in a  cup. Then I sent all the hardware for a bath in boiling water.

When the water was cool enough, I pulled the hardware out and started to rub them. The paint came right off with no stripper, no chemicals, no stink. Yay! Underneath they were a very shiny yellow brass. I didn't like that, so I hit them with a metallic spray paint in a dark color. 

Next, Boyfriend helped me remove the immensely heavy marble top. I added the tiniest amount of wood glue to the joints, and Boyfriend held the joints in place while I added the smallest finish nails I could find. You can barely see them, but they are holding the joints in place very well. Once I got the piece square again, the door started to swing a lot better. 

I wanted to fix the paint job without stripping it, and without sanding away all the neat detail work on the front. So that meant I had to paint it. But I sanded anything that was flat back down to nice clean oak and stained it. A coat of mustard yellow, and voila!


While I was at it I removed the lock from the cabinet, and took it to my local locksmith, Brian and Sons. I wanted to have a key for the lock, so I could use it as a liquor cabinet or something. I don't know. I just felt weird having a lock that wouldn't lock. t really thought they would take one look at that lock and laugh at me. Or tell me it would be a monstrous amount of money. 

They calmly took the lock, fit a key to it, and told me it would be $15 for the first key and $7 for any key after that. I bought two, and it was ready in a day. Amazing! They're professionals who do good work and I would highly recommend them. And they didn't pay me to say so either. 

The only thing left to do with this piece is replace the shoulders on the countertop. I would probably never match the marble, but I'm thinking if I can find a nice thick piece of oak, that would serve. Problem is, finding a nice thick piece of oak lumber of the correct proportions these days will take some doing. But I have not given up hope. 

I've been looking for some similar sideboard from a similar era to try to see what it might be worth - not that I could ever sell this. But it seems to be fairly unique. Everything that's anywhere near close is between $1000 and $1500, and none of them seem to be a similar construction. So I'd say I struck a pretty good bargain, wouldn't you?